3 Steps To Powerful Hips and A Better Squat
If a few brief hip flexor stretches is your idea of mobility work, you’re cutting yourself short. Make hip mobility a priority, and your reward could be a better squat and less back pain!
The hip flexors are a group of five muscles that connect the femur (or thigh bone) to the pelvis. They move in one of two ways. When the pelvis is stationary, a contraction of the hip flexors will draw the femur upward—think the classic “goose step.” Conversely, if the femur is stationary, a contraction of the hip flexors will tilt the pelvis forward and the butt back.
1. Come Unglued
The first step in building better hip flexors is to spend some painful minutes ungluing tissues that have been frozen from years of sitting at a desk. We recommend rolling, aka “self myofascial release.”
You can roll on just about anything. We’ve used several different types of foam rollers, a Rumble Roller, lacrosse balls, PVC pipe, a number of weird stick-shaped things. We have found that different materials are suitable for different areas on different bodies, so feel free to experiment and find what works best for you.
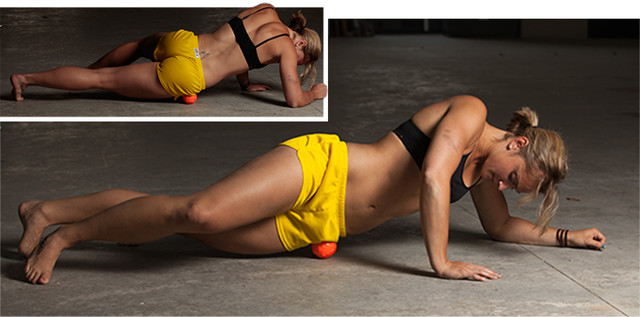
To work these tissues, start by locating your iliac crest. It’s the top bony part of your hip that sticks out by your beltline. If you’re using a lacrosse ball, simply move into a plank position on the ground and lay on the ball so that it presses into your hip just below the crest. Move side-to-side slowly, so the ball moves back and forth laterally several inches at a time.
Keep adjusting your position until you find a hot spot, then hold that position for at least 30 seconds. Your first impulse will be to tense up when you feel tenderness, but it’s important that you relax and continue to move around the area. Keep it up, and don’t hurry. The more slowly and more often you can do this, the better.
2. Get On The Couch
Now that we smoothed out that old tissue and dislodged a few fossilized nasties, let’s see what we can do about improving extensibility. The couch stretch is one of the most effective movements you can do for opening up your hip to the end range of motion. Adopt a kneeling position in front of something that you can use to hold your foot up (i.e., a couch). Your back knee should be completely flexed, meaning your heel is as close as possible to your butt.
It’s easy to compensate in this position by hyperextending your lower back, but it’s crucial that you don’t. Instead, We want you to focus on squeezing your glutes and hamstrings, which will push your hips forward into a full-on “schwing.” If your right foot is back, you should feel an intense stretch on the right front side of your hip. Hold it for a long time, like a minute or two, and then switch sides.
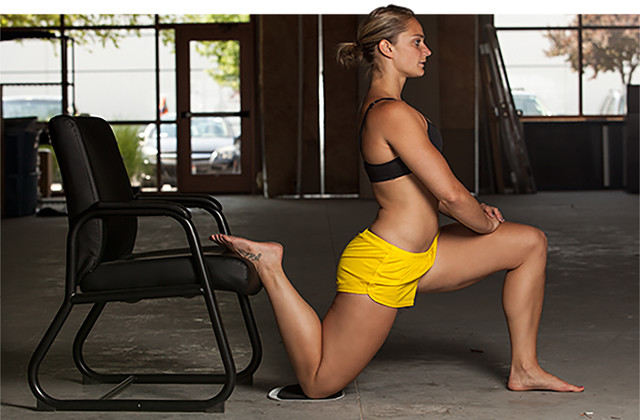
Like rolling, this is a movement that deserves to be done as often as you can tolerate. We recommend doing it for two minutes on each side every half hour. That may be tough to manage, but the point is this: Frequent, long-duration stretches are the only stretches that will have any significant effect on your tissue length and mobility. If you want to improve, you have to commit.
3. Build Flexible Flexors
The psoas, our primary hip flexor, is usually the weakest of the five flexors, and the other four hip flexors have to work more as a result. To test if this is the case for you, lift one knee well above 90 degrees and hold it there, ensuring that you do not compensate by moving your pelvis or leaning forward. If holding this for more than a few seconds is painful or impossible for you, your psoas suck. You are going to have serious trouble squatting to parallel or lower if these muscles can’t do their job properly.
One way to strengthen the psoas is by performing the type of toe-lifting movement.s We mentioned at the start of the article. However, in this case we prefer to rely on closed-chain movements, where the hands are fixed and can’t move. This small change makes it harder to cheat or compensate, allowing you to focus squarely on the movement.
We recommend doing floor-slide mountain climbers. You will need some furniture moving pads, Valslides, or something similar that will slide smoothly on your floor. Paper plates even work well in a pinch. Put your feet on the sliders and move into a push-up position. To perform the movement, simply pull one knee at a time up toward your chest, going as high as you can while keeping your foot on the slider. You can alternate legs with each rep or do sets of one leg at a time. Don’t expect it to be easy.

Your hips may not lie, but they can really sidetrack your training if they fall out of whack. Implement this three-part plan, and your hips will be more effective in the gym and less prone to injury moving forward!
InSync Physiotherapy is a multi-award winning health clinic helping you in Sports Injuries, Physiotherapy, Exercise Rehabilitation, Massage Therapy, Acupuncture & IMS.